Here is a a brief demonstration of authentication and authorization using the FlightNode.Identity API. Significant help developing this received from ASP.NET Identity 2.1 with ASP.NET Web API 2.2 (Accounts Management) by Taiseer Joudeh.
Requires cloning the FlightNode.Identity and FlightNode.Common repositories.
Initial Database Setup
When running on your localhost for the first time, open the NuGet Package Manager Console. Switch to the FlightNode.Identity project. Then execute command Update-Database –Verbose to install the identity model tables into the (localdb)\ProjectsV12 database (that is default server name is in the config file). This uses Entity Framework Code First Migrations to install the database.
The initial database install creates a user with username ab@asfddfsdfs.com and password dirigible1. Clearly it is not good that the whole world knows this now, so the first thing to do is change that password. Which is a great way to test that the install worked properly.
Authenticate
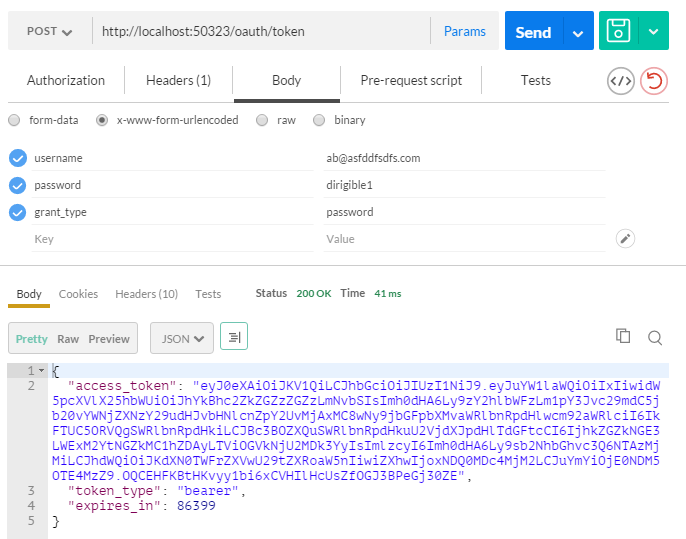
To authenticate, POST a form-encoded body to the /oauth/token endpoint. Screenshots below are using Postman. The response will include an OAuth2 bearer token. In a real application, we would read this token and store* it for use with other API requests. * The best storage mechanism is LocalStorage.
Copy the value of the access_token from the response so that you can use it in subsequent steps.
Modify the User
Now we’ll issue a POST request to the User route, using a JSON-formatted body. Assuming a fresh database install, the user ID will be 1. With this request, we’ll not only change the password, but we’ll also configure a new username, e-mail address and phone number. Leaving the mobile phone number null is just for show and it is not necessary to specify that.
POST http://localhost:50323/api/v1/user/1

Headers:
Content-Type = application/json

Body:
{
  "userId": 1,
  "userName": "dirigible@asfddfsdfs.com",
  "email": "dirigible@asfddfsdfs.com",
  "phoneNumber": "555-555-5555",
  "mobilePhoneNumber": null,
  "password": "dirigible"
 }
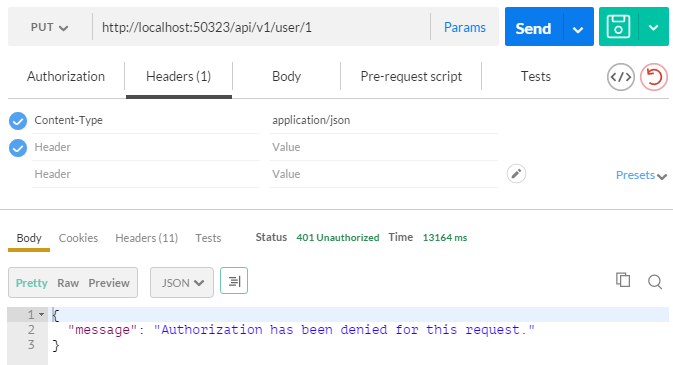
Create Authorization Header
Unauthorized!?!?!?
Well of course, that’s what we wanted: the request did not have a bearer token in it - that is, the user is not authorized. And thus we received status code 401, as appropriate. If you look in the UserController code, you’ll see that it is decorated with the [Authorize] attribute, which is how you tell ASP.NET to check for a valid OAuth2-style bearer token before allowing the
method to be executed.
So what do we need? We need another Header:
Authorization = bearer <the token response from earlier>
And now…
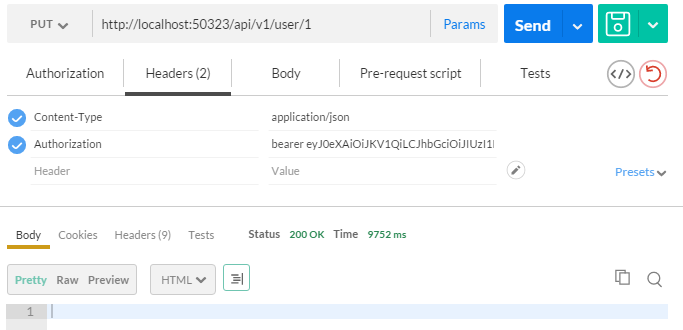
Everything is OK!
Oh, and while working on this code, I actually removed the password save. That should probably only occur with a special request to change the password.
Posted with : Tech, Application Architecture and Design, FlightNode: Citizen Science Bird-Monitoring