Infrastructure-as-code (IaC) is the principle of configuring systems through code instead of mouse clicks (cf Packer Tips and Lessons Learned for another example). TeamCity, the popular continuous-integration (CI) server from JetBrains, enables IaC through writing scripts to interact with its REST API, or by storing projects settings in version control. This article will share some lessons learned in using the Kotlin DSL for project settings. These will include:
- What is Kotlin?
- Benefits of using Kotlin
- Learning Kotlin from TeamCity
- Debugging before committing
- Managing secure data
- Connecting to forks
What is Kotlin?
Kotlin is a language developed by JetBrains, maker of TeamCity. Originally developed for the JVM, it is statically typed and compiled. JetBrains created a Domain-Specific Language (DSL) for describing TeamCity builds: the TeamCity Kotlin DSL. With this, all of the elements of a project - build steps, features, parameters, VCS roots, etc. - are all defined in a relatively easy to learn language, stored in a source control system (e.g. Git), and shareable across multiple installations.
Benefits of Using Kotlin
Some years ago, I had an architect that (quite rightly!) wanted the development teams to treat TeamCity like it is code. The only problem is that we were still clicking around in the user interface. Want to make a change to a build configuration? Copy it, increment a version number, modify, have a reviewer look at the audit history and confirm the output. This actually works reasonably well, but involves a lot of mouse clicking for the reviewer and programmer alike. And it is not transportable.
Build configurations in Kotlin can follow the standard software development life cycle:
- Develop in a text editor / IDE.
- Compile and debug locally.
- Test locally or on a test server.
- Share a code branch for review by another programmer (e.g. through a GitHub pull request).
- Deploy approved code to the production TeamCity server.
Each of these steps contains benefits in themselves. Add them together and you have a powerful system for efficient management of TeamCity configurations. No longer is it “treating TeamCity like code” - it is code.
Learning Kotlin from TeamCity
While the references at the bottom of this article can do much to help with understanding Kotlin, the following tips will help you get started in generating Kotlin configuration from existing build configurations — which is a much easier way to get started compared to learning how to write TeamCity scripts from scratch.
View Snippets in the UI
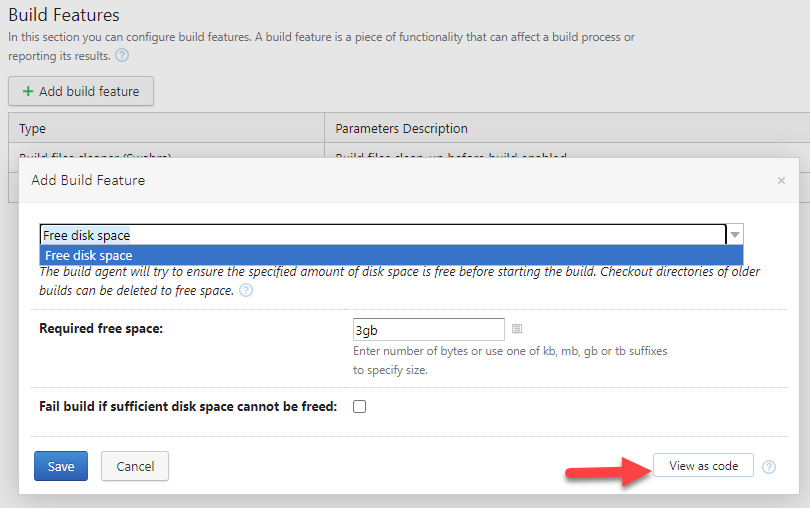
Many of the operations you can perform in the TeamCity web site (“the UI”) will let you view the Kotlin version of your change before committing that change. This is a great way to begin learning how to work with the Kotlin DSL, especially things like build features. The API documentation is of course correct, but hard to translate into reality without seeing these working examples.
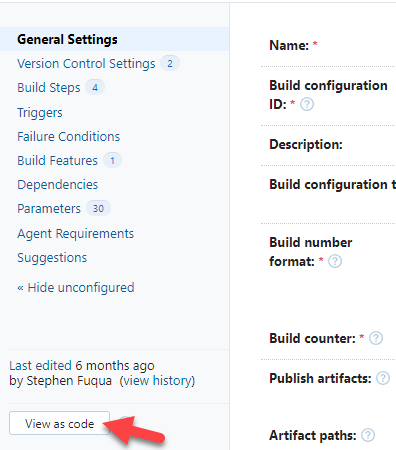
Viewing an individual build configuration:
Viewing a new build feature as code:
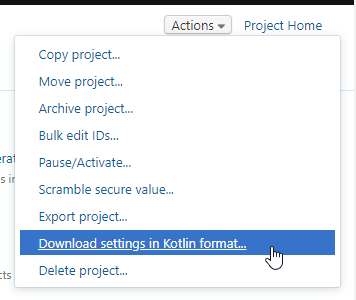
Export an Entire Project
Likewise, you can start your first projects in the UI and learn from them, instead of having to figure everything out from scratch. Take a project - preferably a relatively simple one without dependencies in other projects - and export it to Kotlin. Now you have a detailed example to study.
Internal Setting for Creating Smaller Files
If the project is large, you may want to split it into multiple files. Learning
how to do this from documentation or blog posts is no easy thing. Thankfully
someone asked on
TeamCity],
and someone answered. The answer isn’t entirely instructive, hence the
section below. In particular,
to learn how to split up projects, see the answering author’s comment about
setting the “internal settings” property
teamcity.configsDsl.singleSettingsKts.maxNumberOfEntities to something less
than 20 in TeamCity.
Debugging Before Committing
In the Text Editor / IDE
I’ve been doing all of my work in Visual Studio Code using the Kotlin extension. This extension gives you real-time analysis of basic syntax and semantics, which goes a long way to detecting errors before trying to load your Kotlin scripts into the UI. Other IDEs with built-in or extended support for Kotlin include IntelliJ IDE, Android Studio, and Eclipse. I have not experimented with the others, and so I cannot remark on comparable functionality (although I expect IntelliJ at the least would have excellent support for the language, since it too is made by TeamCity).
Compiling with Maven
One problem with VS Code debugging is that it is not always obvious why something is flagged as an error, and it does not catch all compilation errors. For this, the Maven build tool is quite handy. If you’re not a Java developer you might not be familiar with maven. Thanks to a few random encounters with Maven over the years, I recognized the pom.xml file that was included when I exported a project. This file is similar to package.json or a csproj file. To compile it, install Maven* and then run ` mvn teamcity-configs:generate` in the directory containing the pom file. Read the debug output carefully and you’ll be on your way to fixing up most problems before you ever got to the UI.
Windows users: see the appendix for notes on installing and configuring Maven.
Here’s a sample error message, after I deliberately entered a typo in
the project name for the main settings.kts file:
> mvn teamcity-configs:generate

... skipping some of the output...
[ERROR] Error while generating TeamCity configs:
[ERROR] Compilation error settings.kts[33:15]: Unresolved reference: AdminAppProjecta
[INFO] ------------------------------------------------------------------------
[INFO] BUILD FAILURE
[INFO] ------------------------------------------------------------------------
... skipping remainder of the output...
On the second line, note that it mentions Unresolved reference:
AdminAppProjecta. The correct project name is in fact AdminAppProject without
the “a” at the end.
Testing
Now that you know it compiles, it would be nice to test out your project / modifications before updating your production server. TeamCity has made their free Professional Server quite powerful. This is not a crippled demo. You can install this on your localhost or a test/QA server. Push your DSL scripts to a branch or a fork (not the ones used by your production server), sync your test instance of TeamCity, and test that it really does what you think it does. Now create that pull request.
Managing Secure Data
TeamCity has features for managing tokens that secure private data (e.g. api key, password, etc) in your Kotlin scripts. Personally, I prefer the other recommended approach mentioned in the above article:
“Alternatively, you can add a password parameter with the secure value and use a reference to the parameter in the nested projects.”
Since you want these values to be stored outside of source control, the twin parameters can be setup at a higher level (perhaps in the root project). Each installation of TeamCity will need to re-establish these twin parameters manually. This is a good thing: you can have different credentials for a QA-instance of TeamCity - which may be pointing to different source control forks and to different deployment settings, for example - and production.
Example:
github.accessToken.secured = {your real access token}github.accessToken = %github.accessToken.secured%
All subsequent references would use the shorter of the two. For example, you may have a Git VCS root that needs to be access with secure credentials. If using GitHub, you can use your access token instead of your password when connecting to the API. In your TeamCity Kotlin file, setup the VCS root like this:
    authMethod = password {
        userName = "%github.username%"
        password = "%github.accessToken%"
    }
The github.username would thus also be stored one level above the
source-controlled project, so that it too is not stored in source control.
Connecting to Forks
In GitHub terminology, a “fork” is just a Git clone that is stored under another
organization/user’s account. As described above, with Kotlin files stored in
version control you can create a robust lifecycle that includes testing a
configuration before pushing it to your production instance. One simple way to
manage this is with a personal fork. The following VCS root example uses the
access token approach and combines it with a GitHub organization or username
that is also stored at higher level in the project hierarchy, along with the
username and access token. The branch and branchSpec parameters would be set
in project, template, or buildType files.
package _Self.vcsRoots

import jetbrains.buildServer.configs.kotlin.v2019_2.*
import jetbrains.buildServer.configs.kotlin.v2019_2.vcs.GitVcsRoot

object FlightNodeApi : GitVcsRoot({
    name = "FlightNode.Api"
    url = "https://github.com/%github.organization%/FlightNode.Api.git"
    branch = "%git.branch.default%"
    branchSpec = "%git.branch.specification%"
    userNameStyle = GitVcsRoot.UserNameStyle.FULL
    checkoutSubmodules = GitVcsRoot.CheckoutSubmodules.IGNORE
    serverSideAutoCRLF = true
    useMirrors = false
    authMethod = password {
        userName = "%github.username%"
        password = "%github.accessToken%"
    }
})
References
- TeamCity Help: Kotlin DSL
- Configuration as Code, Part 1: Getting Started with Kotlin DSL
- Configuration as Code, Part 2: Working with configuration scripts
- Configuration as Code, Part 3: Creating build configurations dynamically
- Configuration as Code, Part 4: Extending Kotlin DSL
- Configuration as Code, Part 5: Using libraries
- Configuration as Code, Part 6: Testing configuration scripts
- Stack Overflow: teamcity+kotlin
Appendix: Installing and Configuring Maven
The simplest way to install Maven is with chocolatey; if you don’t already have it, then follow that link to install it.
Do you have a Java Development Kit (JDK) installed? You will need one. I typically use the package provided by Adopt OpenJDK - but not version 16, as there is a bug when trying to compile Kotlin.
> choco install -y adoptopenjdk12
Now you can install Maven:
> choco install -y maven
Before running Maven… if you are on a corporate network that has a custom root security certificate, then you will need to install that into the Java keystore.
- Open a new PowerShell prompt AS ADMINISTRATOR.
-
Check to see if the
JAVA_HOMEvariable is already setup: does it display anything when you type$env:JAVA_HOMEin PowerShell? If not, then…> $env:JAVA_HOME = "C:\Program Files\AdoptOpenJDK\jdk-12.0.2+10" -
Run Java’s
keytoolcommand with the following command. It will prompt you for a password; the default keystore password ischangeit. If you don’t know what that is, then it probably hasn’t been changed from that default value :-D.> keytool -import -trustcacerts -alias root ` -file C:\yourfile.cer -keystore $env:JAVA_HOME/lib/security/cacerts ` -storepass changeit
Posted with : DevOps Tools and Practices, Tech, Software Development Life Cycle